I only recommend products I use myself and all opinions expressed here are our own. This post may contain affiliate links that at no additional cost to you, I may earn a small commission.
This mardi gras mask cake design was for a cake I made for my Nana's 71st birthday. I knew the design I wanted for her cake was mardi gras so I went to Pinterest and searched for mardi gras mask cake. I came across many cakes that served as inspiration for my cake. I wanted a simple round cake with just the mask cake topper.
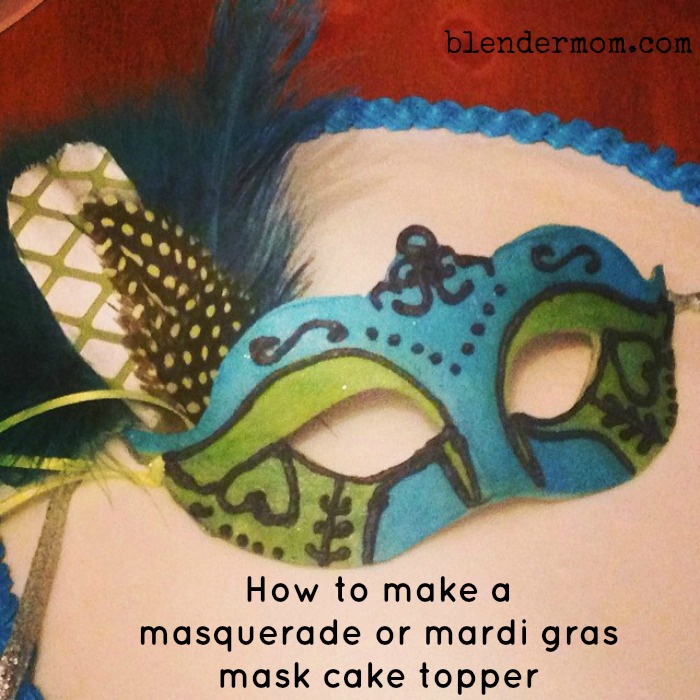
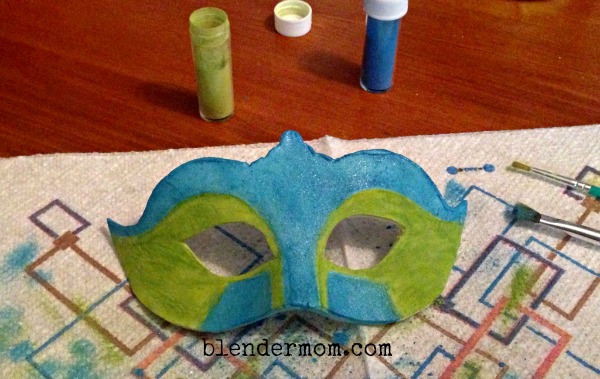
I found this mask template shape that I liked. I printed and cut it out. I liked the shape of this particular mask and knew it would be a good size as the center piece cake topper for my grandma's cake. I baked a 2 layer 10 inch round cake and iced with a buttercream icing. The cake trim is a blue that's pretty close to the shade of blue pearl dust I used on the mask. I gave myself 2 days to complete this mask so it would have plenty of time to be dry and ready to go on the cake later in the week.
To make a gum paste mask cake topper you'll need:
- a printout of a mask template on cardstock paper
- some gum paste
- an X-ACTO knife
- luster or pearl dust
- small paint brushes for the dust
- small batch of royal icing
- pastry bag with a #1 or #2 icing tip
- #10 icing tip
- plastic mask
- optional embellishments, ribbons and/or feathers
You can make gum paste but I choose to buy my gum paste. You can find the Wilton gum paste at Walmart or local craft stores. Take your mask template that you printed and cut it out. Roll out the gum paste to the thickness you want for your mask. I wanted mine thick enough to sit up on the cake by its self and not so thin that when handled it could easily break. I usually smear a little crisco on the gum paste to help prevent wrinkles but I still ended up with 'elephant skin' on a small section of the mask. I don't think anyone noticed it at the party though. If you want to attach ribbon to the mask, use the small end of a #10 icing tip to make holes on each side of the mask for ribbon to go through.
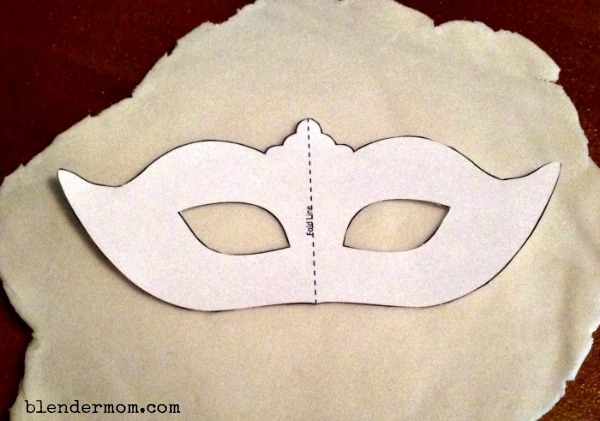
To get the shape of your mask cake topper to look like a mask that can actually be worn, let it dry on a plastic mask so it has the curved feature across the nose. It took 24 hours for my gum paste mask to dry and be firm enough for me to handle and finish decorating. You can see the elephant skin wrinkles on the bottom left corner of my mask. Dang it. Oh well, more crisco and smoothing next time and less handling while wet. I tried using the luster and pearl dusts mixed with a couple drops of clear vanilla extract (vodka is better but I didn't have any on hand) and the painting was not what I was wanting for the look of the mask. So I ended up dry brushing the dusts on top of what I had all ready painted on the mask, gently blowing away the loose excess until I achieved the color looks that I wanted.
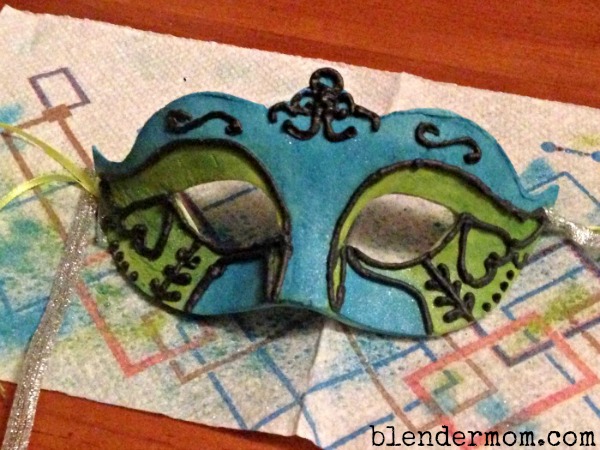
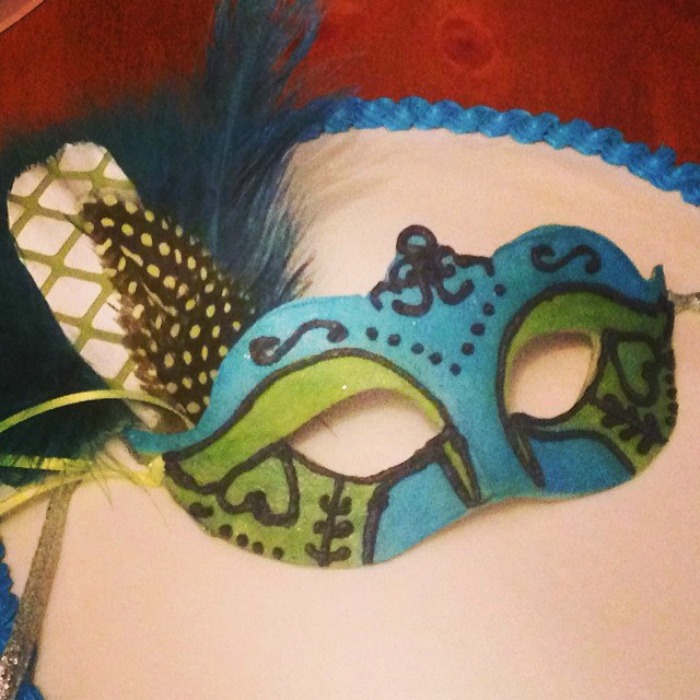
Once I had the colors of the mask how I wanted them I made a small batch of royal icing. This is a recipe I am glad to have my KitchenAid stand mixer for. My last mixer all most blew up when I made a batch of the royal icing. It's some pretty thick stuff. Before you add your royal icing design to your mask I found it easier to attach my (optional) ribbon to my mask first so that I wasn't trying to avoid the icing with my finger as I attached the ribbons. Fill the pastry bag with your choice of colored royal icing with your preferred #1 or #2 icing tip. I didn't really have a design in mind before I got to this point of designing the mask so I just free handed it as I went along. After the royal icing design was on I let it dry a little bit and then tried attaching my feathers by more gum paste to the back of the mask and left it to dry a couple hours. It turned out pretty well I think. Until I picked it up to place it in a container to travel. The feathers broke off of the back of the mask. So what you see here on this cake is the finished mask with the end of the bunch of feathers wrapped in saran wrap and stuck in the cake right behind the mask. Can you tell the feathers weren't attached to the mask?
My grandma loved her cake. As usual she didn't want to cut in to it because she liked looking at it. I had to make her cut the cake.
Krista Cioba says
I am very fascinated with masquerade. Thank you for your post. This is excellent information. It is amazing and wonderful to visit your site. It really gives me an insight on this topic.